> ## Documentation Index
> Fetch the complete documentation index at: https://gcore-doc-1256a.mintlify.site/llms.txt
> Use this file to discover all available pages before exploring further.
# Create a Virtual GPU cluster
Virtual GPU clusters provide GPU computing resources through virtualization, offering flexibility in configuration and resource allocation. Each cluster consists of one or more virtual machines with dedicated GPU access. Virtual GPU is one of the [GPU cluster types](/edge-ai/ai-infrastructure/about-gpu-cloud) available in GPU Cloud, alongside Bare Metal and Spot options.
 ## Cluster architecture
Each Virtual GPU cluster consists of one or more virtual machine nodes. All nodes are created from an identical template (image, network settings, disk configuration). After creation, individual nodes can have their disk and network configurations modified independently.
For flavors with InfiniBand support, high-speed inter-node networking is configured automatically. This enables efficient distributed training across multiple nodes without manual network configuration.
Each node has:
* A **network boot disk** (required). At least one network disk is required as the boot volume for the operating system.
* A **local data disk** added by default. This non-replicated disk is dedicated to temporary storage.
* Optional **network data disks** that can be attached during creation or added later. Network disks persist independently of node state.
* Optional **file share** integration for shared storage across instances.
**Warning**
The local data disk is a non-replicated volume that comes with every Virtual GPU instance. This disk:
* Cannot be modified, detached, or used as a boot volume
* Is strictly bound to the specific virtual machine and its configuration
* Is wiped when the node is reconfigured, powered off (shelved), or deleted
Use this disk only for temporary data. Store all important data on network disks or NFS storage to prevent data loss.
## Create a Virtual GPU cluster
To create a cluster:
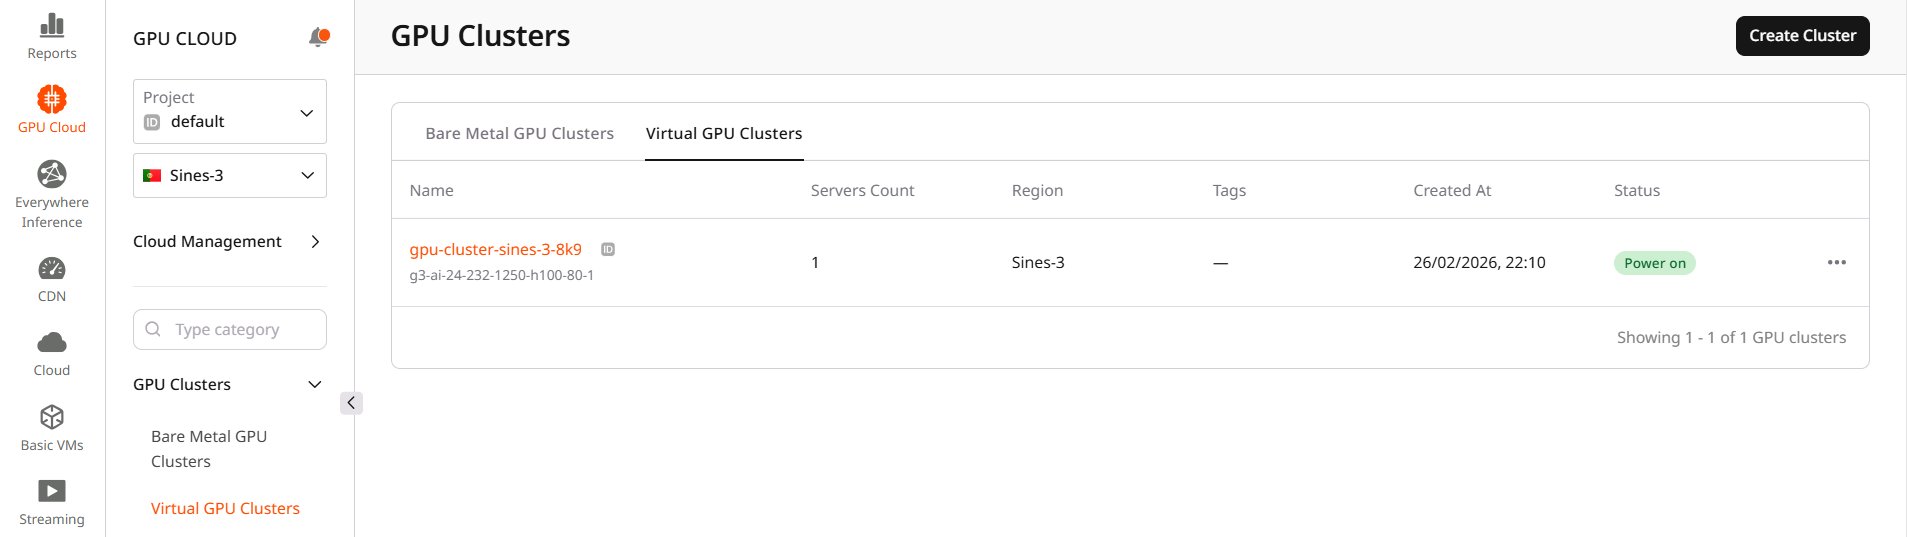
1. Open the [Gcore Customer Portal](https://portal.gcore.com) and go to **GPU Cloud**.
2. Select **Sines-3** region.
3. Navigate to **GPU Clusters** > **Virtual GPU Clusters**.
4. Click **Create Cluster**.
### Step 1. Configure cluster capacity
Cluster capacity determines the hardware specifications for each node in the cluster.
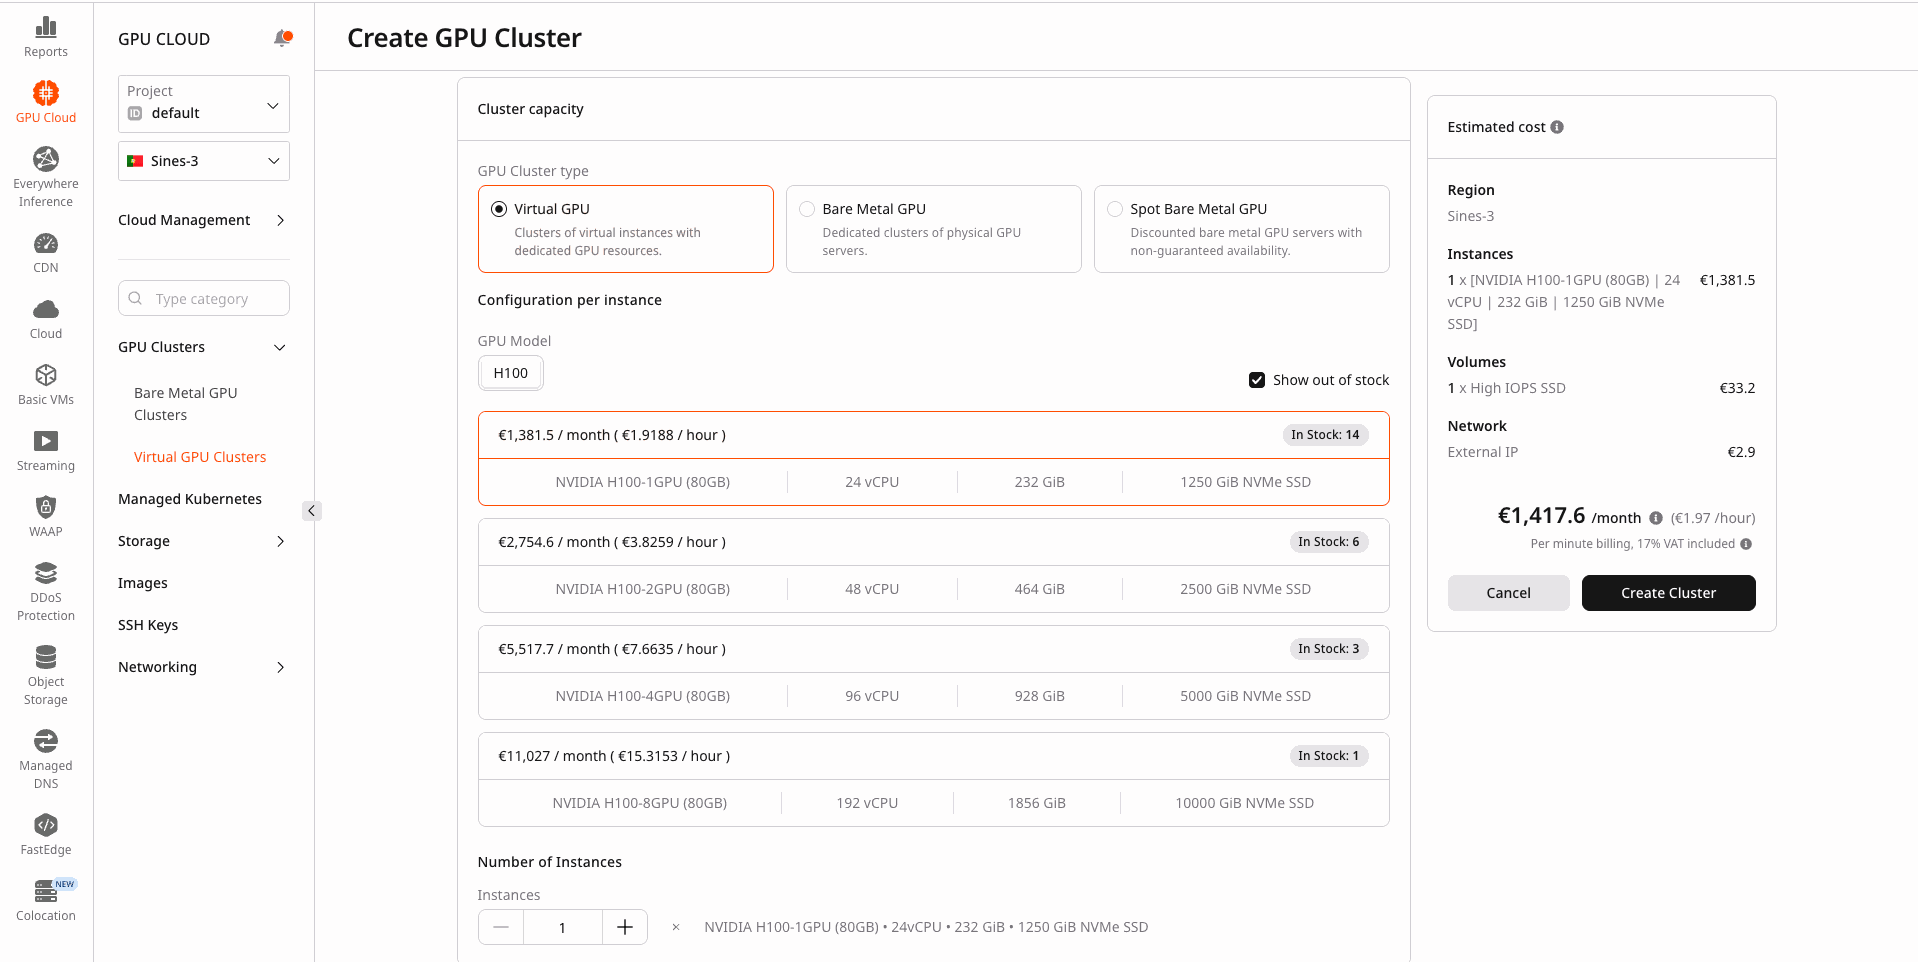
1. Select the **GPU Model**. Available models depend on the region.
2. Enable or disable **Show out of stock** to filter available flavors.
3. Select a flavor. Each flavor card displays GPU configuration, vCPU count, RAM capacity, and pricing.
## Cluster architecture
Each Virtual GPU cluster consists of one or more virtual machine nodes. All nodes are created from an identical template (image, network settings, disk configuration). After creation, individual nodes can have their disk and network configurations modified independently.
For flavors with InfiniBand support, high-speed inter-node networking is configured automatically. This enables efficient distributed training across multiple nodes without manual network configuration.
Each node has:
* A **network boot disk** (required). At least one network disk is required as the boot volume for the operating system.
* A **local data disk** added by default. This non-replicated disk is dedicated to temporary storage.
* Optional **network data disks** that can be attached during creation or added later. Network disks persist independently of node state.
* Optional **file share** integration for shared storage across instances.
**Warning**
The local data disk is a non-replicated volume that comes with every Virtual GPU instance. This disk:
* Cannot be modified, detached, or used as a boot volume
* Is strictly bound to the specific virtual machine and its configuration
* Is wiped when the node is reconfigured, powered off (shelved), or deleted
Use this disk only for temporary data. Store all important data on network disks or NFS storage to prevent data loss.
## Create a Virtual GPU cluster
To create a cluster:
1. Open the [Gcore Customer Portal](https://portal.gcore.com) and go to **GPU Cloud**.
2. Select **Sines-3** region.
3. Navigate to **GPU Clusters** > **Virtual GPU Clusters**.
4. Click **Create Cluster**.
### Step 1. Configure cluster capacity
Cluster capacity determines the hardware specifications for each node in the cluster.
1. Select the **GPU Model**. Available models depend on the region.
2. Enable or disable **Show out of stock** to filter available flavors.
3. Select a flavor. Each flavor card displays GPU configuration, vCPU count, RAM capacity, and pricing.
 ### Step 2. Set the number of instances
In the **Number of Instances** section, specify how many virtual machines to provision in the cluster.
Each instance is a separate virtual machine with the selected flavor configuration. When created, all instances have identical configurations. The minimum is 1 instance, maximum depends on regional availability.
### Step 3. Select image
The image defines the operating system and pre-installed software for cluster nodes.
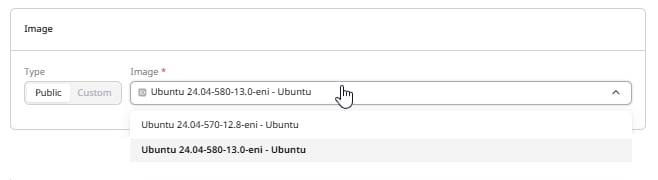
In the **Image** section, choose the operating system:
* **Public**: Pre-configured images with NVIDIA drivers and CUDA toolkit
* **Custom**: Custom images uploaded to the account
The default Ubuntu images include pre-installed NVIDIA drivers and CUDA toolkit. Images with the `eni` suffix are configured for InfiniBand interconnect.
### Step 2. Set the number of instances
In the **Number of Instances** section, specify how many virtual machines to provision in the cluster.
Each instance is a separate virtual machine with the selected flavor configuration. When created, all instances have identical configurations. The minimum is 1 instance, maximum depends on regional availability.
### Step 3. Select image
The image defines the operating system and pre-installed software for cluster nodes.
In the **Image** section, choose the operating system:
* **Public**: Pre-configured images with NVIDIA drivers and CUDA toolkit
* **Custom**: Custom images uploaded to the account
The default Ubuntu images include pre-installed NVIDIA drivers and CUDA toolkit. Images with the `eni` suffix are configured for InfiniBand interconnect.
 ### Step 4. Configure volumes
Each Virtual GPU cluster instance has the following storage:
* **System volume** (required): The boot volume for the operating system. This network disk persists across power cycles.
* **Local volume**: Added automatically to every instance. This non-replicated disk is dedicated to temporary storage only. It cannot be edited, removed, or used as a boot volume. Data on this disk is deleted when the instance is shelved, reconfigured, or deleted.
* **Additional network volumes** (optional): Additional persistent storage that survives power cycles.
### Step 4. Configure volumes
Each Virtual GPU cluster instance has the following storage:
* **System volume** (required): The boot volume for the operating system. This network disk persists across power cycles.
* **Local volume**: Added automatically to every instance. This non-replicated disk is dedicated to temporary storage only. It cannot be edited, removed, or used as a boot volume. Data on this disk is deleted when the instance is shelved, reconfigured, or deleted.
* **Additional network volumes** (optional): Additional persistent storage that survives power cycles.
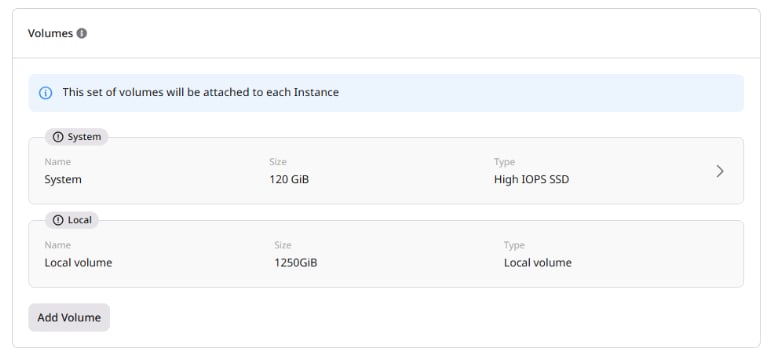 Configure the **System** volume:
* **Name**: Enter a name for the volume
* **Size**: Minimum size depends on the selected image (default: 120 GiB)
* **Type**: Select from available storage types in the region
To add additional storage, click **Add Volume** and configure the name, size, and type for each volume. All configured volumes are attached to every instance in the cluster.
**Warning**
Store important data on network volumes or file shares, not on the local volume. The local volume is wiped when the instance is shelved, reconfigured, or deleted, resulting in permanent data loss.
After cluster creation, network volumes can be managed individually per instance.
### Step 5. Configure file share integration (optional)
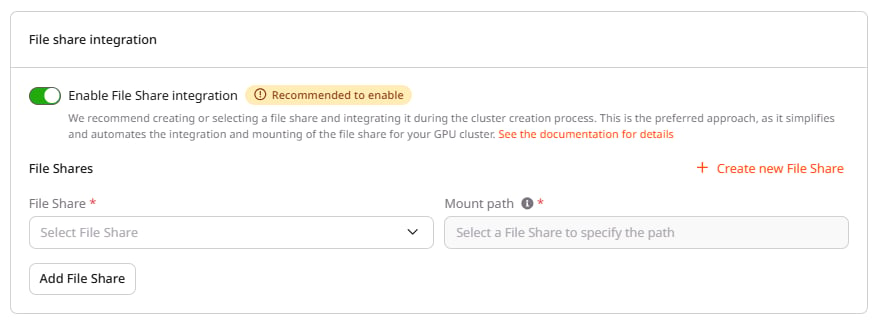
The **File share integration** section enables connecting a [shared file system](/cloud/file-shares/configure-file-shares) accessible across all instances in the cluster.
Enabling file share integration is recommended for workflows that require shared data access, such as distributed training or shared datasets.
To enable file share integration:
1. Enable the **File Share integration** toggle.
2. Select an existing file share or create a new one.
Configure the **System** volume:
* **Name**: Enter a name for the volume
* **Size**: Minimum size depends on the selected image (default: 120 GiB)
* **Type**: Select from available storage types in the region
To add additional storage, click **Add Volume** and configure the name, size, and type for each volume. All configured volumes are attached to every instance in the cluster.
**Warning**
Store important data on network volumes or file shares, not on the local volume. The local volume is wiped when the instance is shelved, reconfigured, or deleted, resulting in permanent data loss.
After cluster creation, network volumes can be managed individually per instance.
### Step 5. Configure file share integration (optional)
The **File share integration** section enables connecting a [shared file system](/cloud/file-shares/configure-file-shares) accessible across all instances in the cluster.
Enabling file share integration is recommended for workflows that require shared data access, such as distributed training or shared datasets.
To enable file share integration:
1. Enable the **File Share integration** toggle.
2. Select an existing file share or create a new one.
 ### Step 6. Configure network settings
Network settings define how the cluster communicates with external services and other resources based on the [network architecture](/cloud/networking/create-and-manage-a-network). At least one interface is required.
**Info**
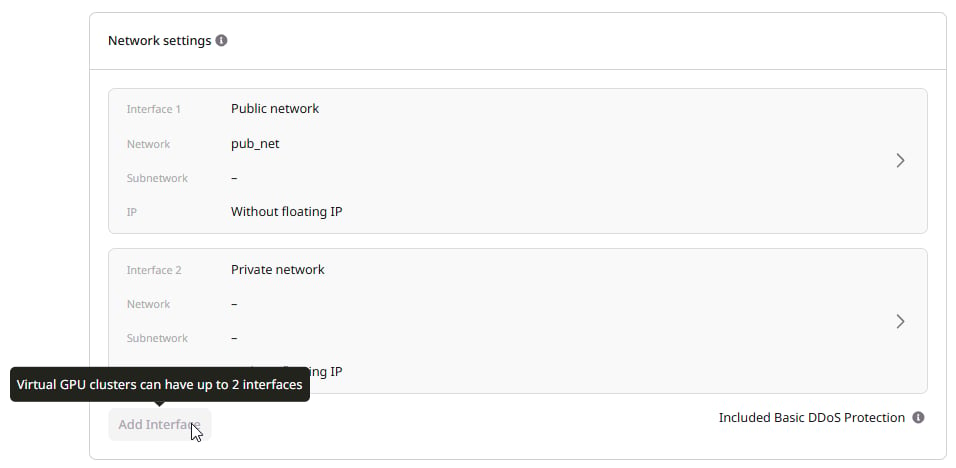
Virtual GPU clusters support a maximum of 3 network interfaces (Public and Private combined) per instance. If file share integration is enabled, the limit is reduced to 2 interfaces, because one interface is reserved for NFS connectivity.
InfiniBand interfaces are not counted toward this limit; they are configured automatically based on the selected flavor.
In the **Network settings** section, select an interface type:
| Type | Access | Use case |
| -------------------- | --------------------------------------------- | ----------------------------------------------------- |
| **Public** | Direct internet access with dynamic public IP | Development, testing, quick access to cluster |
| **Private** | Internal network only, no external access | Production workloads, security-sensitive environments |
| **Dedicated public** | Reserved static public IP | Production APIs, services requiring stable endpoints |
To add additional interfaces, click **Add Interface**.
### Step 6. Configure network settings
Network settings define how the cluster communicates with external services and other resources based on the [network architecture](/cloud/networking/create-and-manage-a-network). At least one interface is required.
**Info**
Virtual GPU clusters support a maximum of 3 network interfaces (Public and Private combined) per instance. If file share integration is enabled, the limit is reduced to 2 interfaces, because one interface is reserved for NFS connectivity.
InfiniBand interfaces are not counted toward this limit; they are configured automatically based on the selected flavor.
In the **Network settings** section, select an interface type:
| Type | Access | Use case |
| -------------------- | --------------------------------------------- | ----------------------------------------------------- |
| **Public** | Direct internet access with dynamic public IP | Development, testing, quick access to cluster |
| **Private** | Internal network only, no external access | Production workloads, security-sensitive environments |
| **Dedicated public** | Reserved static public IP | Production APIs, services requiring stable endpoints |
To add additional interfaces, click **Add Interface**.
 Each interface can be expanded to configure security groups. In the **Security Groups** field, select one or more [security groups](/cloud/networking/add-and-configure-a-firewall) to control inbound and outbound traffic for that interface. The `default` security group is pre-selected. If no security group is selected, the default security group is attached automatically.
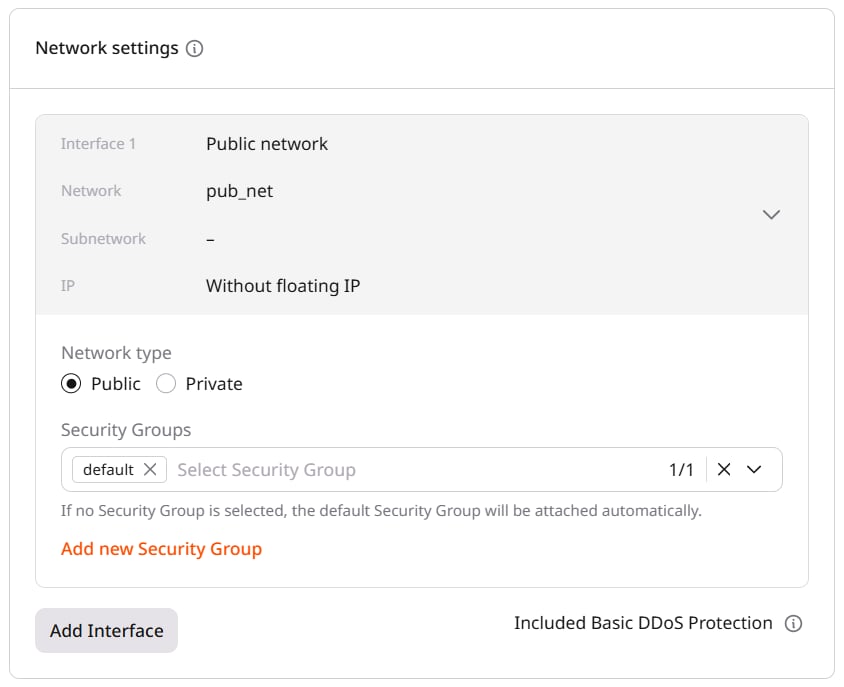 To create a new security group, click **Add new Security Group** and configure inbound and outbound rules in the dialog.
### Step 7. Configure SSH key
In the **SSH key** section, select an existing key from the dropdown or create a new one. Keys can be uploaded or generated directly in the portal. If generating a new key pair, save the private key immediately as it cannot be retrieved later.
### Step 8. Set additional options
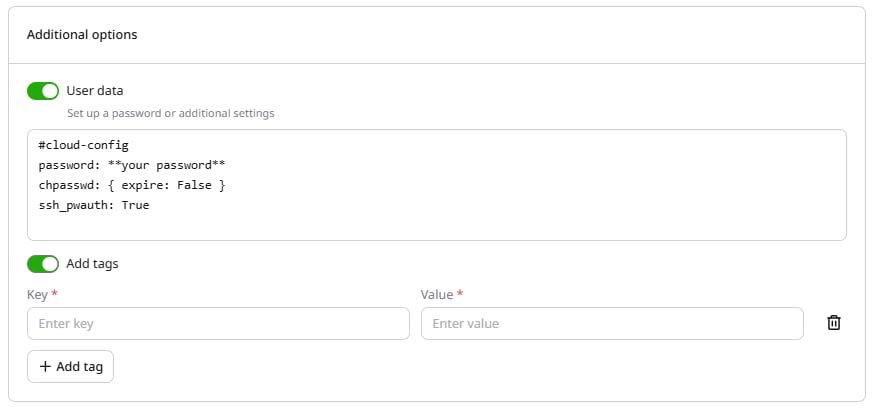
The **Additional options** section provides optional settings: user data scripts for automated configuration and metadata tags for resource organization.
To create a new security group, click **Add new Security Group** and configure inbound and outbound rules in the dialog.
### Step 7. Configure SSH key
In the **SSH key** section, select an existing key from the dropdown or create a new one. Keys can be uploaded or generated directly in the portal. If generating a new key pair, save the private key immediately as it cannot be retrieved later.
### Step 8. Set additional options
The **Additional options** section provides optional settings: user data scripts for automated configuration and metadata tags for resource organization.
 ### Step 9. Name and create the cluster
The final step assigns a name to the cluster and initiates provisioning.
1. In the **GPU Cluster Name** section, enter a name or use the auto-generated one.
2. Review the **Estimated cost** panel on the right.
3. Click **Create Cluster**.
Once all instances reach **Power on** status, the cluster is ready for use.
**Warning**
Cluster-level settings (image, default networks) cannot be changed after creation. New nodes added via scaling inherit the original configuration. To change these settings, create a new cluster.
## Connect to the cluster
After the cluster is created, connect to a node via SSH and verify that GPUs are available.
1. Open a terminal and connect using the default username `ubuntu`:
```bash theme={null}
ssh ubuntu@
```
Replace `` with the public or floating IP shown in the cluster details.
2. Verify that GPUs are detected:
```bash theme={null}
nvidia-smi
```
A successful output shows the list of available GPUs, driver version, and CUDA version. If the command fails or no GPUs appear, the image may be missing the correct drivers.
For nodes with only private interfaces, connect through a bastion host or VPN, or use the [Gcore Customer Portal console](/cloud/virtual-instances/connect/connect-to-your-instance-via-control-panel).
Clusters can also be created programmatically using the [GPU Virtual API](/api-reference/cloud/gpu-virtual/create-virtual-gpu-cluster).
### Step 9. Name and create the cluster
The final step assigns a name to the cluster and initiates provisioning.
1. In the **GPU Cluster Name** section, enter a name or use the auto-generated one.
2. Review the **Estimated cost** panel on the right.
3. Click **Create Cluster**.
Once all instances reach **Power on** status, the cluster is ready for use.
**Warning**
Cluster-level settings (image, default networks) cannot be changed after creation. New nodes added via scaling inherit the original configuration. To change these settings, create a new cluster.
## Connect to the cluster
After the cluster is created, connect to a node via SSH and verify that GPUs are available.
1. Open a terminal and connect using the default username `ubuntu`:
```bash theme={null}
ssh ubuntu@
```
Replace `` with the public or floating IP shown in the cluster details.
2. Verify that GPUs are detected:
```bash theme={null}
nvidia-smi
```
A successful output shows the list of available GPUs, driver version, and CUDA version. If the command fails or no GPUs appear, the image may be missing the correct drivers.
For nodes with only private interfaces, connect through a bastion host or VPN, or use the [Gcore Customer Portal console](/cloud/virtual-instances/connect/connect-to-your-instance-via-control-panel).
Clusters can also be created programmatically using the [GPU Virtual API](/api-reference/cloud/gpu-virtual/create-virtual-gpu-cluster).