> ## Documentation Index
> Fetch the complete documentation index at: https://gcore-doc-1256a.mintlify.site/llms.txt
> Use this file to discover all available pages before exploring further.
# Extend CDN functionality with FastEdge
Integrate your CDN resource with FastEdge if you need to **introduce additional functionality** to Gcore CDN and customize its behavior for various use cases.
Such a setup allows you to extend the CDN beyond standard features and implement advanced logic for:
* Authentication checks. Deploy FastEdge apps based on the JWT authentication template or develop a custom authentication functionality.
* Custom headers modification. Adjust header information on requests for personalized and more secure content delivery.
* Custom access rules. Use advanced geo-blocking and time-based blocking to control user access to your content and mitigate potential threats.
## How it works
Unlike traditional HTTP applications, a CDN application in FastEdge must be developed according to the [Proxy-Wasm (WebAssembly for Proxies)](https://github.com/proxy-wasm/spec) specification. This ensures compatibility and standardization across different CDN environments.
The application is called at the early stage of CDN processing, allowing for immediate intervention and customization. We're actively working on new interception points across the CDN workflow to cover many use cases.
The FastEdge application can be invoked at the following stages of the CDN processing workflow:
* **On request headers:** when we receive an HTTP request from a client.
* **On request body:** when we receive an HTTP request body from a client.
* **On response headers:** before we start sending HTTP response headers to a client.
* **On response:** before?we start sending an HTTP response to a client.
You can only configure **one application per stage**.
## Set up FastEdge integration with the CDN
To get started, you need a CDN resource configured for your origin. If you don't have Gcore CDN set up, follow the instructions in this guide: [Create a CDN resource](/cdn/getting-started/create-a-cdn-resource/overview).
### Step 1. Create a FastEdge application
You can deploy an application from a predefined template or from a custom Wasm file. If you choose the latter option, ensure your Wasm binary file complies with the [WebAssembly standard for proxies](https://github.com/proxy-wasm/spec).
Currently, you can use a predefined template to enable authentication in your application. The template is configured to verify the JSON Web Token (JWT) in the request header.
To deploy an application from the template:
1. In the [Gcore Customer Portal](https://portal.gcore.com/accounts/reports/dashboard), navigate to **FastEdge**.
2. Open the **CDN Applications** page and click **Create new application**.
 3. In the **Create from a template** section, choose **Validate JWT in Authorization header**.
 4. Enter a name for your application and, optionally, update its description.
5. Add required environment variables, such as a token signing key that will be used for authentication checks.
4. Enter a name for your application and, optionally, update its description.
5. Add required environment variables, such as a token signing key that will be used for authentication checks.
 6. Click **Save and deploy**.
Your application has been successfully deployed and can now be accessed through the CDN.
6. Click **Save and deploy**.
Your application has been successfully deployed and can now be accessed through the CDN.
 If you need to adjust the configuration, click **Actions** > **Edit application**.
 If you want to deploy a FastEdge application from your own binary, check the examples of custom implementation in our repository: [FastEdge application examples](https://github.com/G-Core/FastEdge-examples).
To deploy a FastEdge application from your own binary:
1\. In the [Gcore Customer Portal](https://portal.gcore.com/accounts/reports/dashboard), navigate to **FastEdge**.
2\. Open the **CDN Applications** page and click **Create new application**.
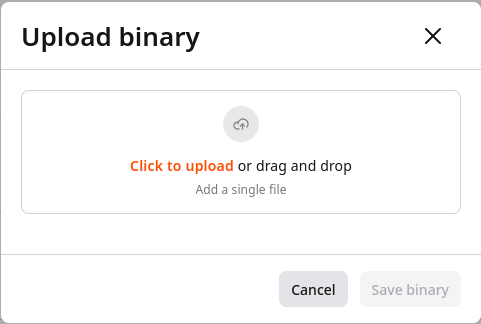
3\. Click **Upload binary**.
If you want to deploy a FastEdge application from your own binary, check the examples of custom implementation in our repository: [FastEdge application examples](https://github.com/G-Core/FastEdge-examples).
To deploy a FastEdge application from your own binary:
1\. In the [Gcore Customer Portal](https://portal.gcore.com/accounts/reports/dashboard), navigate to **FastEdge**.
2\. Open the **CDN Applications** page and click **Create new application**.
3\. Click **Upload binary**.
 4\. Choose your custom binary file.
 5. Enter a name for your application and, optionally, add a description.
6. Add required environment variables that will be used for authentication checks. Enter the data as key-value pairs.
5. Enter a name for your application and, optionally, add a description.
6. Add required environment variables that will be used for authentication checks. Enter the data as key-value pairs.
 **Info**
If you're adding sensitive information or want to ensure that any data in the app's configuration remains secure, click **+ Add Secret** and use the [Secrets Manager](/fastedge/secrets-manager/manage-secrets).
7. Click **Save and deploy**.
Your application has been successfully deployed and can now be referenced from CDN resource settings. To adjust the configuration, click **Actions** > **Edit application**.
**Info**
If you're adding sensitive information or want to ensure that any data in the app's configuration remains secure, click **+ Add Secret** and use the [Secrets Manager](/fastedge/secrets-manager/manage-secrets).
7. Click **Save and deploy**.
Your application has been successfully deployed and can now be referenced from CDN resource settings. To adjust the configuration, click **Actions** > **Edit application**.
 ### Step 2. Enable FastEdge functions for your CDN resource
You can enable the configured Wasm functionality for the whole CDN resource or just some URLs.
1. In the Gcore Customer Portal, navigate to **CDN**.
2. Find the resource you want to integrate with FastEdge and open the **resource settings**.
### Step 2. Enable FastEdge functions for your CDN resource
You can enable the configured Wasm functionality for the whole CDN resource or just some URLs.
1. In the Gcore Customer Portal, navigate to **CDN**.
2. Find the resource you want to integrate with FastEdge and open the **resource settings**.
 3. Scroll the page down to the **FastEdge apps** section and enable the toggle for the event you need.
Currently, we support four events: **On request headers**, **on request body**, **on response headers**, and **on response body**.
3. Scroll the page down to the **FastEdge apps** section and enable the toggle for the event you need.
Currently, we support four events: **On request headers**, **on request body**, **on response headers**, and **on response body**.
 4. Choose your application from the dropdown.
 5. (Optional) **Select the Interrupt request processing in case of error** checkbox.
**Info**
The **Interrupt request processing in case of error** checkbox is enabled by default. This ensures that any errors on the FastEdge side will be returned to the browser with the relevant response code. If you disable the checkbox, CDN will ignore the error and pass requests directly to the origin. For security considerations, we recommend keeping this checkbox active.
6. Click **Save**.
You can set up a function within your uploaded FastEdge application to manage incoming request headers only for specific URLs. For example, protect some parts of your content with a JWT token, and keep the other URLs unaffected.
To enable the function for specific URLs:
1. In the Gcore Customer Portal, navigate to **CDN**.
2. Find the resource you want to integrate with FastEdge and open the resource settings.
3. Click **Rules** > **Create rule**.
5. (Optional) **Select the Interrupt request processing in case of error** checkbox.
**Info**
The **Interrupt request processing in case of error** checkbox is enabled by default. This ensures that any errors on the FastEdge side will be returned to the browser with the relevant response code. If you disable the checkbox, CDN will ignore the error and pass requests directly to the origin. For security considerations, we recommend keeping this checkbox active.
6. Click **Save**.
You can set up a function within your uploaded FastEdge application to manage incoming request headers only for specific URLs. For example, protect some parts of your content with a JWT token, and keep the other URLs unaffected.
To enable the function for specific URLs:
1. In the Gcore Customer Portal, navigate to **CDN**.
2. Find the resource you want to integrate with FastEdge and open the resource settings.
3. Click **Rules** > **Create rule**.
 4. Click **Create blank rule**.
5. Give your rule a name.
6. In the **Match criteria** section, specify the content affected by the function configured in your FastEdge application.
7. In the **Options** section, click **Add option**.
8. Scroll the page down to the **FastEdge apps** section and enable the toggle for the event you need.
Currently, we support four events: **On request headers**, **on request body**, **on response headers**, and **on response body**.
9. Choose your application from the dropdown.
10. (Optional) **Select the Interrupt request processing in case of error** checkbox.
4. Click **Create blank rule**.
5. Give your rule a name.
6. In the **Match criteria** section, specify the content affected by the function configured in your FastEdge application.
7. In the **Options** section, click **Add option**.
8. Scroll the page down to the **FastEdge apps** section and enable the toggle for the event you need.
Currently, we support four events: **On request headers**, **on request body**, **on response headers**, and **on response body**.
9. Choose your application from the dropdown.
10. (Optional) **Select the Interrupt request processing in case of error** checkbox.
 **Info**
The **Interrupt request processing in case of error** checkbox is enabled by default. This ensures that any errors on the FastEdge side will be returned to the browser with the relevant response code.
If you disable the checkbox, CDN will ignore the error and pass requests directly to the origin. For security considerations, we recommend keeping this checkbox active.
12. Click **Create rule**.
## Disconnect FastEdge from CDN
If you no longer need to use the functionality configured in your FastEdge application, you can disable the FastEdge functions for your CDN resource.
The steps will slightly differ depending on whether you remove FastEdge from **the whole CDN resource or just specific URLs**.
1. In the Gcore Customer Portal, navigate to **CDN**.
2. Find the resource integrated with FastEdge and open the **resource settings**.
3. If you enabled FastEdge for a **whole CDN resource**, disable the toggles you no longer need.
4. If you enabled FastEdge just for **particular paths**, open the **Rules** page and disable the toggle for the required rule.
5. Click **Save changes**.
You've successfully disconnected your CDN resource from FastEdge.
## Delete CDN application in FastEdge
**Info**
**You can't delete an enabled FastEdge application connected to a CDN resource**. To remove the application, disconnect it from the CDN resource first.
To delete an application:
1. In the Gcore Customer Portal, navigate to **FastEdge**.
2. Open the **CDN Applications** page and click the three-dot icon next to the application that you want to remove.
**Info**
The **Interrupt request processing in case of error** checkbox is enabled by default. This ensures that any errors on the FastEdge side will be returned to the browser with the relevant response code.
If you disable the checkbox, CDN will ignore the error and pass requests directly to the origin. For security considerations, we recommend keeping this checkbox active.
12. Click **Create rule**.
## Disconnect FastEdge from CDN
If you no longer need to use the functionality configured in your FastEdge application, you can disable the FastEdge functions for your CDN resource.
The steps will slightly differ depending on whether you remove FastEdge from **the whole CDN resource or just specific URLs**.
1. In the Gcore Customer Portal, navigate to **CDN**.
2. Find the resource integrated with FastEdge and open the **resource settings**.
3. If you enabled FastEdge for a **whole CDN resource**, disable the toggles you no longer need.
4. If you enabled FastEdge just for **particular paths**, open the **Rules** page and disable the toggle for the required rule.
5. Click **Save changes**.
You've successfully disconnected your CDN resource from FastEdge.
## Delete CDN application in FastEdge
**Info**
**You can't delete an enabled FastEdge application connected to a CDN resource**. To remove the application, disconnect it from the CDN resource first.
To delete an application:
1. In the Gcore Customer Portal, navigate to **FastEdge**.
2. Open the **CDN Applications** page and click the three-dot icon next to the application that you want to remove.
 3. Click **Delete**.
4. Confirm your action by clicking **Yes, delete**.
3. Click **Delete**.
4. Confirm your action by clicking **Yes, delete**.
 You've successfully removed your CDN application from Gcore FastEdge.